Documentation - 1:1000 ROC Site Model
Assignment 3 Documentation - 1:1000 Site Model
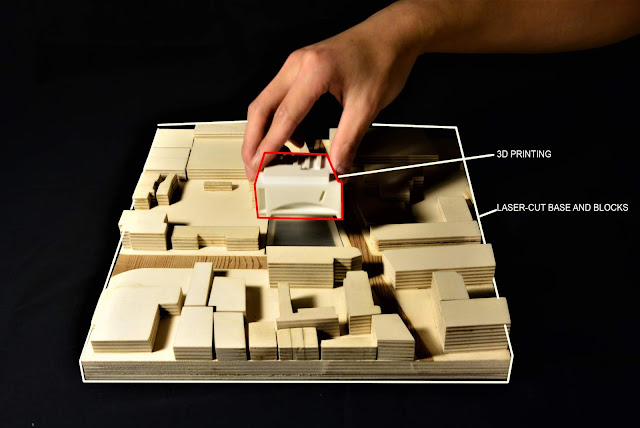
This model is trying to capture the relationship between the ROC and the urban condition. Also, this model utilised a wide range of materials and techniques in order to show the contrast of the surrounding road and building blocks. The use of inlay timber veneer highlighted the public connections in the site model. Additionally, with the contrast of acrylic block and white building massing, the building is able to distinguish from the others and shows its connection with its urban contexts. The utilization of laser cutting and digital file preparation ensure the model is accurate and reliable. Lastly, few touches on the base installation and sanding the surface provide this model with its professionalism and premium quality.
Scale: 1:1000
Material & Techniques:
Lasercut - Cut and Engrave for Inlay timber veneer road
Lasercut - Plywood Site base & Building block
Lasercut - acrylic block with sanding
3D Printing - Rail Operation Centre
Base construction:
1. Preparation(3 hrs,$0)
The preparation for this project, I used Rhino to digitalize the urban context near the site.The road was expressed by timber veneer to shows the contrast. This will be done by engraving on the plywood. And the building will be shown as 3D print white massing, in order to show the contrast.
For the surround building height, I used the 3D map to estimate.
2. Laser-cut - Base (Cutting base and acrylic block veneer for inlay, Engrave for road, Light score for surrounding buildings) (2hr, $15 laser-cutting, $30 Materials)
Video shows the process of cutting and engraving.
3. Sanding
After laser cutting, I glued down veneer and pressed down for 1 hour. After that, I used 380 grit sandpaper to sand the surface. Additionally, sanding the clear acrylic block can turn it into a mat finish.
 |
| Sanding the acrylic block to turn the finish into matt. |
 |
| Sanding the plywood base with veneer |
4. 3D Printing
After construction of the base, the main building is modelled in Sketchup and ready to print. (7hr, $18 3D printing)
Sketchup model of the building
 |
| 3D Printing In progress |
After 3D printing, The support from the 3D print will need to be removed. Additionally, the model is sanded with 380 to 800 grit sandpaper to finish up the building.(2hr, $0 3D printing)
 |
| Removing 3D printed support and sanding |
 |
| Assembly for testing |
The final step is to laser cut all the surrounding building with 6mm plywood and glue them together to get the estimated height. The with 380 grit sandpaper, the burn mark can be removed.(5hr, $15 Laser-cutting, &15 plywood)
 |
| Plywood surrounding building |
 |
| Assembly of the model - final |
Conclusion: The used of timber base works perfectly for this project. Also, the veneer works for showing the contrast with the surrounding buildings. The project spent 20 hrs and $105 in total, which is $13 below the budget. There are also improvements can be made. For example, the surrounding building block can be acrylic block, therefore the building is more stand out from the crowd.


Comments
Post a Comment